S'more Mountains
(row 8)

This row is made of 6, 10" x 10" finished blocks. (If you measure your block from edge to edge it will measure 10 1/2" x 10 1/2". The extra 1/2" is for the seam allowances.)

I designed this block for a Moda Bakeshop quilt featured in August of 2013. It is constructed by combining half square triangles and jelly roll strip units.
Fabric Requirements:
- Dark Mountains - 1/3 yard - I used Bella Chocolate (SKU#9900-41)
- Light Sky - 1/3 yard - I used Bella Neutral (SKU#9900-12)
- Striped Mountains - 8 jelly roll strips, or equivalent scraps (I used 16, 2 1/2" x 22" cuts from fat quarters)

Cutting Directions:
- From Dark Mountains fabric
- Cut 1, 11 1/4"x width of fabric (wof) strip
- cut 2, 11 1/4"x 11 1/4" squares from wof strip
- Set remnant, 11 1/4" x 19 ish" aside.
- From Light Sky fabric
- Cut 1, 11 1/4"x wof strip
- cut 2, 11 1/4"x 11 1/4" squares from wof strip
- Set remnant, 11 1/4" x 19 ish" aside.
- From Striped Mountains fabric (if not using jelly rolls)
- Cut enough 2 1/2" strips to make 8, 2 1/2" x 42" pieces)
Break time!!
Well, no, I don't think you need a break yet. I don't really need one either at this point....but I was expecting one. You might have been as well at this point in the game.

That is what a quilt of this row looks like. Isn't it fun?! Directions are all written out for you over on Moda's Bakeshop.
and back to the directions for this row...

Sewing Directions:
LARGE STRIPED TRIANGLES:
- From jelly roll
- Randomly sew 2 sets of 4 strips together along the long edge
- Iron seam allowances open
- To open seam allowances place the sewn strip on a hard surface (like a cutting table or desk) Spread the larger pieces of fabric to the sides, right side down, then use your finger nail to nudge the seam allowances apart. The use STEAM to set the seams open.

- Each strip set should measure approximately 42" x 8 1/2"
- Using the lines on your ruler cut 45 degrees from the corner of the first strip set.

- Turn ruler over and make second cut on strip set at 45 degrees from the last edge cut.

- Continue in this manner across set for 4 large right triangles per set
- Because you will be working with biased edges the pieces will have a tendency to stretch. Do the best that you can to keep things square, but don't worry too much about it. These triangles are large enough to be squared up when you get to the final step of block construction.
- Repeat process with remaining strip set for a total of 8 large right triangles.
- NOTE: As you only need 6, you will have two extras.
MOUNTAIN BLOCKS:
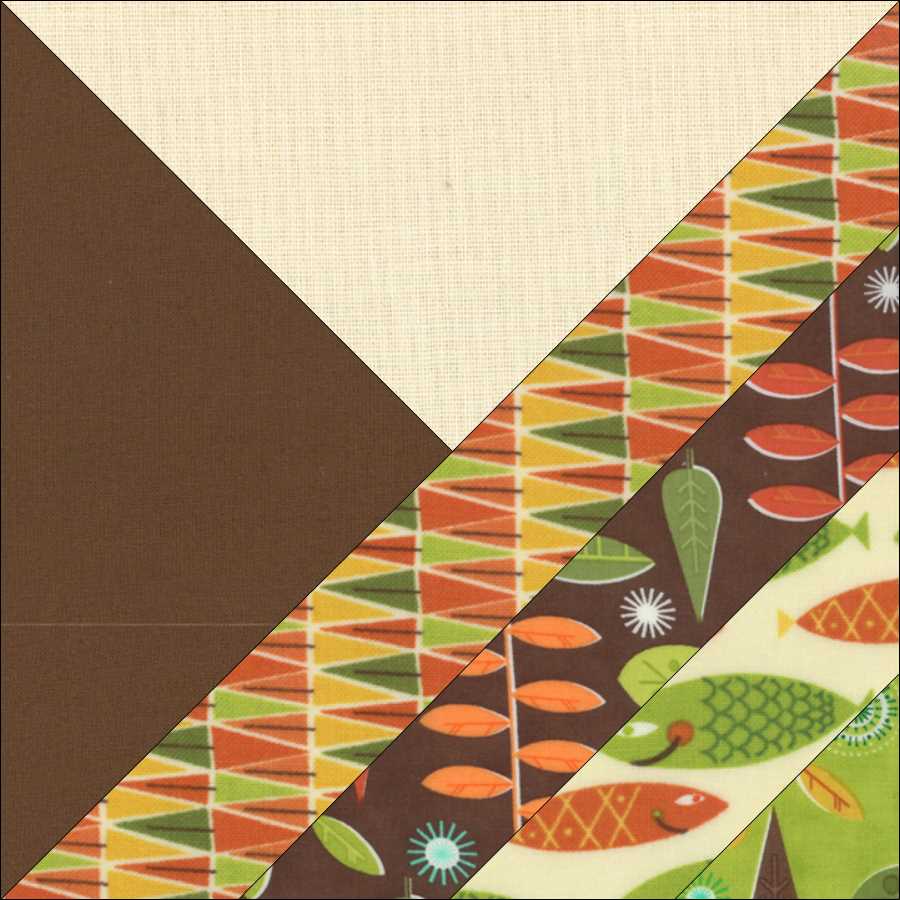
- Gather
- 2, dark 11 1/4"x 11 1/4" squares
- 2, light 11 1/4"x 11 1/4" squares
- 6, large, striped right triangles
- Make 3 half square triangles (HST)
- Draw a line diagonally across the wrong side of each light 11 1/4"x 11 1/4" square
- Align one light square atop one dark square with right sides together
- Sew 1/4" to each side of the drawn line
- Cut on line to make 2 HST
- Iron seam allowances open.
- Cut each HST in half diagonally, perpendicular to the seam to make 2 right triangles each (mirror images of each other)
- Repeat process with remaining squares, but do not cut the last HST in half for 6 bi-colored large triangles.
- Sew one striped triangle to one bi-colored triangle
- The striped triangles will be bigger than the bi-colored triangles. I did this on purpose so that the cutting would be easier. I found trimming after the weird blocks were made more accurate than trimming stretchy triangles.
- Align the triangles along the hypotenuse (the side opposite the right angle), with right sides together, pin!
- Sew along the hypotenuse to make one large square-ish shape.
- Iron seam allowances towards the striped triangle.
- Trim to 10 1/2" x 10 1/2" square - be sure to keep the center of the square where the hypotenuse and the seam of the bi-colored triangle meet.
- Repeat with remaining triangles for 6 blocks.
Assemble row to look like picture.

4 comments:
Those blocks make for a very cool quilt!
Fab. Instructions as usual! Did you end up with left over "opposite" triangles?
I remember when this came out. Such a striking quilt
The cutting dimensions provided on Moda Bakeshop are not correct. I wanted to make this quilt but, fortunately, made a sample block first. After struggling a bit, I checked this blog and found the right square sizes. I'm not crazy after all!
Post a Comment