Followers

Monday, December 16, 2013

S'more Rows.4 Fussy Cutting


Fussy Cutting
(rows 2,4,6 & 8)
 
 
My most favorite piece of fabric from S'more Love is the multi stripe.  It is the only piece on which you can find Mr. Campy and his chocolate bar friend.  They are what ultimately tipped the scale for me.
 
This multi stripe is printed along the long edge of the fabric.  That means you can get continuous lengths of a particular portion of the stripe if you are very careful when you cut it.
 
For this quilt I chose to highlight my favorite parts - twice.  However, there is plenty of cuteness to go around.  Pick the portion of the stripe that you like the best.


 Fabric Requirements:
  • Multi stripe - 1 3/4 yards - I used #37070-11
 
 
Cutting Directions:
  • You need 4 pieces each measuring 4" x 60 1/2"
 
  • Figure out where you want to cut it to get the width you need
 
 
  • I chose between the two pink lines for two of my stripes, and between the two blue lines for the other.
  • You will need to cut into the edge of a bordering segment of stripe - that is okay.  It will be in your seam allowance.
  • Lay your ruler along the edge of the printed stripe you select and cut along the length of the fabric.  (It is weird, I know, but you can do it.  Take your time.)
  • NOTE - not all fabric is printed squarely with the weave.  If your piece is not square, don't worry about it...just cut it that way and remember that there may be some stretch to this section of the quilt.
 
Sewing Directions: 
  • No that is not a trick instruction.  It is December.
  • If you are like me you have gifts in the making.
  • Go work on them and have a very blessed holiday with your family!!
 
 
Merry Christmas from Tops to Treasures!!


Tuesday, December 3, 2013

Huevos Rancheros, Fat Cats, and Christmas?

My mind is going a mile a minute today.  Listening in isn't something that I usually recommend.  A day in my head can be a frightening thing, but today it is amusing me....and making me cry....and I want to share it with you.

Huevos Rancheros  - my lunch.  Sounds much better in Spanish.


Scrambled eggs and salsa just doesn't sound as yummy.  Mine didn't look as yummy as the picture, but yummy it was. (For the record I am still starving...maybe I need huevos X dos!)

Christmas isn't a season....is it?  I mean if you are a Bible believing Christian, then you ought to behave like it is December 365 days out of the year, not just the 25 days leading up to Christmas day.


Maybe I am wrong...but seems to me that December is the season where the world lets us get away with talking about Jesus...as long as He stays a baby in the manger and I bring a gift with the me no one gets very upset about the noise I make.  However, just because it is December doesn't mean that the message is any different.  I ought to share it all of the time.


When the cat leaves you a message outside the box it is time to do something about the box.  However, you do NOT have to feed the cat every time it meows at you as you walk through the kitchen.


I want to give my friends and family great gifts. I want to make them smile and feel encouraged.


People are like snowflakes, we are all different, all fragile, all in need of a fresh breath of life to come in and boost us over the next hurdle.  Pain is pain - it really doesn't matter what is causing the pain, if you feel it, it is real and I should respect that.  I don't need to compare your pain to mine, or mine to yours.  It is all the same.  We are all in need of a cure......

Christmas is about the cure, not the baby.

I believe in the Bible.  I don't understand all of it, but I choose to believe all of it anyway.  I figure God will fill me in on the answers that I need, and the rest of them I will let him handle.

In it I am told that God created the world and everything in it with the words from his mouth.  This in itself is amazing.  My words hold nothing like that kind of power.

When He was done creating, He set man in charge of everything.  It was a well oiled clock, new out of the package.  All man had to do was pick fruit and enjoy life with God.

There was ONE rule, "Do NOT eat of the tree of the knowledge of good and evil." Can you imagine living in a place where that was the only rule.  Wow!  AND you get to wander around and visit with THE Creator every day.  We could have asked Him what was up with the giraffe's long neck or the platypus bill.  All of the whys in this world and we would be free to ask them of the one person who could give us the right answer.  Just the thought makes me giddy.


There was no laundry to do either!  Adam and Eve were naked and unashamed.  What a gig.

Didn't last long.  I don't know how long it lasted, but the Bible doesn't waste much time in telling me that they broke the rule.  That one rule, the only rule they had to keep, BUSTED.  With it man's eyes were opened and the beautiful creation, that clock right out of the package began to crumble.  Creation was no longer perfect.

You and I live with imperfection all the time.  It is just how things are....now.  God on the other hand does not.  I don't know why.  He puts up with a lot, but not that.  Maybe it is His one rule.  I don't know. However, if He is big enough and powerful enough to create everything with a word then I'm going to let Him have that one.  God requires perfection.

At this point man was, excuse the expression, screwed.  Kicked out of the garden, needing to work for his living, no more walking with God, AND now he had to wash laundry too.  We've been messed up ever since.

All of that happens in the first few chapters of the first book.  Kind of depressing isn't it.  Kind of like the world we live in.  Broken.  Painful.  Hopeless.

BUT

This is the good part, pay attention.  BUT God (the two best words in any language) knew all along what was going to happen and had a plan to fix things.  (He had the plan to fix it before we broke it.  How cool is that?!)

He set His plan in motion to fix things a very long time ago.  Basically, the plan is called Jesus.  Yes, Jesus the baby in the manger that gets celebrated at Christmas.  That Jesus.  The point isn't Jesus though, the point is that he came to fix the problem.

God sent his only begotten son, Jesus, so that we could be reunited with Him, God, even though we are NOT perfect, broken, laundry doers.  


Jesus fixes the problem once and for all.  God knows we are broken.  God knows we are going to screw up again and again.  God knows that the world as it stands now is broken - full of death and decay - not at all like the creation He started with.  Jesus came so that he could die, like the animal sacrifices of long ago, he died to make things right.  Unlike the lambs slaughtered in the Old Testament, Jesus's sacrifice is permanent.

BUT the world is still broken.  Yep, it is.  But the Bible says that one day Jesus will come again and in That day it will be fixed for good.  Return to Eden, life with God face to face, no laundry!

Christmas isn't the baby, or the gifts we give each other, or evergreen trees with pretty lights, it is so very much more.  When everything else fades, when December 25, 2013 is a long lost memory, and the let down after the party hits, remember that there is another Christmas coming.

That, my friend, is the most precious thing I own.  The faith that one day it will all be fixed.  The knowledge that God has a plan for our good.  

The most precious thing I own was and is free.  I didn't have to do a thing, no sacrifices, no offerings, no special prayer, or perfect behavior required.  All I did was choose to believe that it is true, and the weight of the big broken world that I live in was lifted from my shoulders.  I accepted a gift freely offered.


I've done my best to offer the same gift to you.  With it may the joy of The Christmas to come fill you from head to toe and light you from within.  May it warm you when you are cold and fill you when you are hungry (that and a tasty meal which I would attempt to feed you were you sitting next to me.)  and may it make you giggle just a little the next time you are faced with a mountain of dirty laundry.

Merry Christmas my friends!

Monday, December 2, 2013

November in my Rearview....

It is hard to believe that 2013 is nearly over.  November is done and gone.  The turkey and stuffing and cranberry sauce have been made, shared with family, and turned into a weekend of glorious leftovers.  The kids are back to school and wondering how they are going to make it the three weeks to the big break at Christmas.  (Don't tell them, but I am kind of wondering that too.)

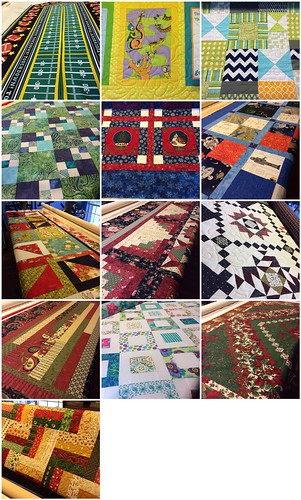
This month at Tops to Treasures I quilted 13 quilts, of various sizes and for various purposes, but all for happy customers.

November 2013 Tops to Treasures

I also taught two sessions at Happiness is Quilting...one was a class for S'more Mountains.  The pattern is free on Moda Bake Shop...

S'more Mountains

the other was a demo on paper piecing.    In both cases it was fun to spend the day in the cozy atmosphere of a quilt shop and share with other quilters.  I'd be thrilled to see those of you in the vicinity at my next events with Happiness.  December 21st, I will be there from 11:00 am to 1:00 pm for a quick demo on fussy cutting.  January 4th I will be there all day teaching Midwinter Cozy.


I also got to see my son's football team play in the Cowboy's Stadium in Arlington Texas.  Wow - what a huge facility.  
While we waited for our game to start....it didn't start until 9:45 pm on a school night.
  (Yeah, my thoughts too, but what are you going to do?)


Pumped up and waiting their grand entrance to the field.
Our team didn't win....but it was a grand adventure for them.

My final finish of the month was a "tacky sweater" for my oldest son.  He is bound and determined to win every "Tacky Sweater Contest" he comes across....so to keep your trek into Christmas jolly I'll leave you with one last picture....  
You should see it when the nose is blinking and the techno version of Rudolph is singing!
My dear husband had to try it on to see if Rudolph was positioned correctly.  Noah has promised me a video of the sweater in all it's glory (lights blinking, song singing, boy dancing.)  I will be sure to share that with you when I get it.

Saturday, November 16, 2013

S'more Rows.3 Exploding Stars

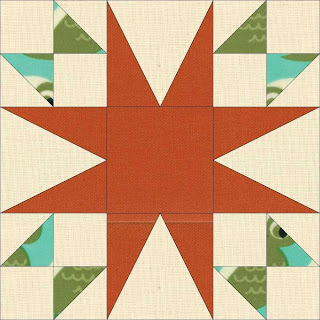
Exploding Stars
(row #1)
This row is made up of 6, 10" x 10 " finished blocks.  (If you measure your block from edge to edge it will measure 10 1/2" x 10 1/2".  The extra 1/2" is for the seam allowances.)


The Exploding Star block is a nine patch block made of 1 square patch (the center), 4 pieced patches that look like open beaks (the edges) and 4 twinkles patches (the corners).  It is essentially the same block that we made last month.  Only the corner patches are different.

About those patches... I had planned to construct these by making half square triangles, and sewing them in four patches with tiny squares.  However, I found that the size of the block frustrated my plans.  The best I can figure the problem lies in the size of the block.  10"  x 10" is not neatly divisible by 6 when your rulers are all based on quarter inches.   Either I had to make the block bigger(there is no way I was going to make it smaller) or I had to find a more accurate way to make the block.   Consequently, I resorted to paper piecing.  This is not a traditional use of the method...but it works, and your pieces will fit the way they are supposed to.  If you have never paper pieced please refer to my tutorial for more specific instructions.

Fabric Requirements:
  • Background - I used Bella neutral (SKU #9900-12)
    • 2/3 yard, or 23" x width of fabric (wof)  plus the remnant (3 7/8" x 26-ish") from step 1   
  • Stars -  
    • 6, 10" x 10" squares
  • Twinkles-
    •  6, sets of 8, 2 1/2" x 2 1/2" squares (this fits perfectly on a 5" x 10" rectangle)
  • Printer paper, 6 sheets
    • When you print the pattern be sure that your settings are as follows
      • Fit to printable area - YES!!!
    • Print one page and measure the pattern pieces
      • The largest solid line rectangles should measure 3 3/8" x 1 11/16"
    • Once you are sure the pieces print out correctly, print the remaining 5 pages.
    • You need 6 of this pattern 
Cutting Directions:
  • Background
    • Edge pieces
      • You need 24, 3 7/8" x 3 7/8" squares
      • cut 2, 3 7/8" x wof strips
        • sub cut into 10, 3 7/8" x 3 7/8" squares each for 20 squares
      • cut 4, 3 7/8" x 3 7/8" squares from remnant from step 1
    • Corners
      • Background
        • You need 96, 2 1/2" x 2 1/2" squares
          • cut 6,  1/2" x wof strips
            • sub cut each strip into 16, 2 1/2" x 2 1/2" squares
  • Stars - cut one set of the following from each of 6 squares - one for each block.
    • Centers - cut 1, 3 7/8" x 3 7/8" square
    • Points - cut 4, 3" x 5" rectangles
  • Twinkles - cut one set for each of 6 squares - one for each block.
    • cut 8, 2 1/2" x 2 1/2" squares
  • Paper - cut rectangles apart, just outside the dotted line.  You should have 48 rectangles when you are done.

Break time!!

I meant it when I told you last month that I need a break between cutting and sewing.  So I'm going to share another quilt with you. 

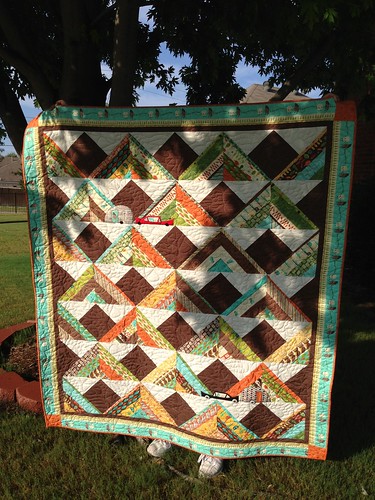
This is what Exploding Stars looks like when  you replicate it.  I hope it makes you smile as much as it does me.


If you make 16 blocks and set them in a grid of 4 x 4 you get the quilt above.  By adding two borders the finished quilt measures 68" x 68".  It is a nice sized throw.

Specific fabric requirements are:
  • Background - 2 1/2 yards
  • Inner border -
    • 2 3/4 yards - if you fussy cut it like I did in my drawing you need OR
    • 3/4 yards - otherwise.
  • Outer border - 1 yard
  • Stars - 16, 10" x 10" squares
  • Tinkles - 16, 5" x 10" rectangles
  • Binding - 1/2 yard
  • Backing - 4 1/4 yards 


...and back to our regularly scheduled directions....


Sewing Directions:
  • Make one block at a time.
  • Gather:
    • Background
      • 4, 3 7/8" x 3 7/8" squares
      • 16, 2 1/2" x 2 1/2" squares
    • Star
      • 1, 3 7/8" x 3 7/8" square
      • 4, 3" x 5" rectangles
    • Twinkle
      • 8, 2 1/2" x 2 1/2" squares
    • Paper
      • 8 rectangular pattern pieces
  • EDGE BLOCK CONSTRUCTION:
    • Gather
      • 4, 3 7/8" x 3 7/8" squares background fabric
      • 4, 3" x 5" rectangles star fabric
    • Make edge blocks according to the directions used in last months post.  (You can go back to it here.)
      • The difference between the two rows at this point is only the color of the fabric  you are using.

  • CORNER BLOCK CONSTRUCTION:
    • Gather
      • 16, 2 1/2" x 2 1/2" squares background fabric
      • 8, 2 1/2" x 2 1/2" squares twinkle fabric
      • 8, rectangular, paper pattern pieces
    • Make 4 blocks according to paper pieced pattern - refer to tutorial if you need help.

  • ASSEMBLE BLOCK
    • Gather 9, 3 7/8" blocks (4 corners, 4 edges, 1 center)
    • Arrange blocks
      • The star triangles meet beside the center block.
      • The background triangles should be pointing toward the center.
      • The twinkle 4 patches look like the butterflies are flying away from the center.
    • Sew blocks together to make three rows.
      • Rows 1 & 3: 4 patch flying toward the upper left, edge block pointing down; 4 patch flying toward the upper right
      • Row 2: edge block pointing to the right; center (matches star points); edge block pointing to the left.
    • Sew rows together to make block.
    • Trim to 10 1/2" x 10 1/2" square
  • Repeat 5 times for a total of 6 Exploding Star blocks.
  • Sew 6 blocks in a row to complete Exploding Star row of this project.