Followers

Monday, September 16, 2013

S'more Rows.1 Fabric Requirements

Welcome!!
 
This is the first post in my S'more Rows quilt project.
 
Row Boat
 
I am glad you have decided to row along!~
 
 
Save the dates!
S'more Rows is an 11 month project.   On the 16th of each month from September 2013, until July 2014 I will post one step in the directions for my S'more Rows quilt.
 
The rows are NOT made in order of their appearance on the quilt.  Rather, they are arranged in order of ease of construction, with the easiest bits being scheduled over the Christmas holidays.
 

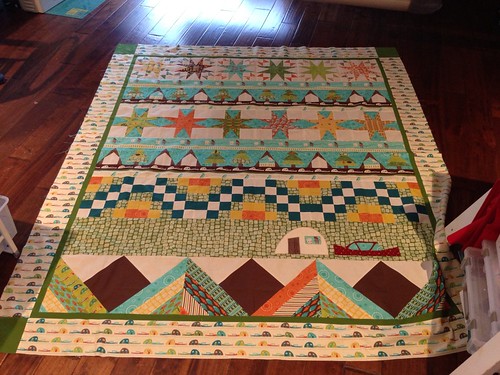
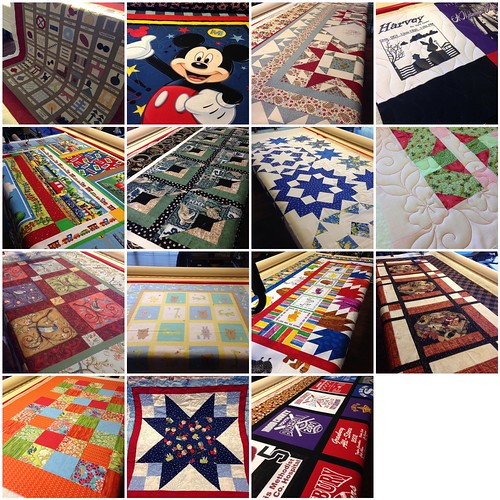
The picture above shows my original drawing  - labeled so that you will know roughly what to expect when.  As I made the quilt it changed just a bit....I think it got cuter!

This month I'm sharing the fabric requirements with you.

S'more Rows was inspired by the S'more Love fabric line created by Eric and Julie Comstock for Moda fabrics.  This line shipped to stores in August 2013.  My drawing is based on the fabrics in that line.  This does NOT mean that your quilt needs to be.

This is primarily a scrappy quilt.  You can make many of the blocks from scraps.  That said, there are a few places where the S'more Love line is obviously the focus of my quilt.

You need the following cuts from S'more Love to duplicate this focus.

SKU #

Description of fabric

Yardage needed

Where I Used it
37075-17
Aqua star bursts
1 1/4 yard
background for rows 3 + 7
blue diamonds in row 5
37076-15
green blocks
1 yard
background for row 10
37075-13
orange star bursts
1 yard
binding, and row 9
37070-11
multi stripe
2 yards
fussy cut for rows 2, 4, 6, and 8
37071-11
car stripe on cream
1 1/4 yards
outer border

If I could only pick one of these cuts of fabric, I would pick the multi stripe.  It is my favorite from the line.  The quirky drawings of Mr. Campy and his pal Mr. Chocolate add immeasurably to the charm of this quilt.


The remainder of the fabric used came from the following cuts
SKU#
Description of Fabric
Yardage needed
 
S’more Love Fat Quarter Bundle
1 fat quarter bundle
9900-234
Bella Evergreen (dark green)
3/4 yard (inner border and setting squares)
9900-12
Bella Neutral (cream)
2 yards (neutral background)
9900-230
Bella Peacock
1/4 yard
9900-213
Bella Mustard (gold)
1/4 yard
3300-41
Bella Chocolate (brown)
1/3 yard

(The backing for this quilt requires 5 yards of standard width fabric.)


I promised a give away today.....so....leave a comment, tell me about something that makes you happy, and I will pick a winner to be announced next month...on Dad's birthday!!  The winner will receive this yummy jelly roll from The Fat Quarter Shop.


Saturday, September 14, 2013

They call him the Tinman....

Can we go yet?!


This is my Johnny!  He is 17, and a senior in high school.  For my non-American friends this is his last year in our public school system, in 3 months he will be eligible to enlist in our armed forces (I doubt that will happen), vote in both national and local elections (I hope that this one does happen) and be considered an adult everywhere except a bar (I seriously doubt that he is interested in alcoholic beverages anyway). 
 
Earlier this week he had "heart surgery".  I put that in quotes because I have a hard time calling it surgery.  Whether that is from denial on my part or the fact that they didn't actually cut him open I don't know.  It might be a bit of both. 
 
John had an irregular heart beat.  It was just like any boys most of the time, but on an occasion it would be super charged and beat far faster than it ought to.  The one time we were able to capture a picture of what was happening the doctor clocked it at 240 beats/minute.  I believe a normal heart beats 60 beats/minute.   That time he was playing dodge ball, however, his heart would go into over drive when he was sleeping.  My understanding is that this wasn't exactly hurting my boy, but left untreated could cause issues later....like an enlarged and over worked heart, or him passing out.  In short is was going to limit what his ability to participate fully in this life.
 
The doctors suspected that he had an extra unprotected circuit in his heart.  Did you  know that our hearts are electrical?  They have biological circuits in them that work just like a the metal ones that run our lamps and lap tops.  They usually have breakers on them so that impulses remain controlled.  In John's case the extra circuit, the rogue, didn't have a breaker on it because it was outside the normal system.  Consequently when it got utilized it didn't know how to stop...it just kept looping.
 
The plan was to go in, find the rogue and disconnect it. Tuesday morning they did just that.
 
For all of the prayers and well wished I thank you!  I am blessed to have such quilty friends, and awed at the mighty workings of my God and His creation.
 
This is a picture of the tinman.
 
Oh...his friends have given my boy all sorts of heart related nicknames now...


Thursday, September 5, 2013

S'more Rows.0

woo hoo!!
 
My Photo Stream-116
The top is done. 
 
 
 The posts are written....and scheduled!
 
The Crooked Hour Glass
 
  The count down begins.
 
 I hope you will all join me in a few weeks (17 days!) when my row-a-long begins.
 I have a few give aways to post then as well.

Tuesday, September 3, 2013

Paper Piecing Tutorial

Paper Piecing
 
I am by no means an expert on paper piecing.  It is, however, on of my favorite methods of piecing small quilts.
Hurry Up Spring!
Paper pieced mini made I made for a S.T.U.D. swap
 
It works something like this.....you have a fiddly pattern with either tiny pieces or odd sized shapes.  You can draw it accurately, but converting it to fabric is a little dicey.
 
Felix the Fox paper piecing pattern 1
A paper pieced fox?!
 
What do you do?  You draw the pattern on paper and then sew the fabric to the paper....use the lines as your seam lines.  Sounds crazy I know, but it really does work.
 
 
Take a look at a pattern....
 Twinkle Block
 
 
This block is made of three pieces.  You could easily make it from a half square triangle and a square.  However, what if the square was only 1" x 1"?  The half square triangle would be too tiny to think about.  The seam allowances would be bigger than the piece exposed.  Not my idea of a fun time.  Enter foundation paper piecing.
 
Use the paper as a foundation for your piecing and the tiny size doesn't matter.
 
Notice that the pattern has both solid and dashed lines.  The dashed lines notate the outside edge of the block.  This is the cutting line, used to square up your block when you are done piecing.  The solid lines are sewing lines.  They will be where your seams are when the blocks are put together.
 
The pattern also has numbers and letters.  The letters indicate what section of the block you are working on.  All pieces in the same section have the same letter.  The numbers indicate a suggested order of construction.


The process entails aligning your fabric pieces with the lines on the paper, then using the paper lines to sew on.  In order to see the paper lines you have to align the fabric with the back of the paper.  You will need good lighting to be able to see what you are doing.
 
Because you sew on the paper lines, the paper becomes part of your block.  You will eventually want to remove it...else have a crunchy quilt!  To make this easier REDUCE THE LENGTH OF YOUR STITCHES.  More stitches means more perforations means easier removal when the time comes.
 
Let's start with something easy....

 
    • Pick up 1 paper rectangle and hold it up to the light with the printing away from you.  See the lines through the paper?!
    • Center 1 brown square on top of the shadow of the square at the center of the paper.  (It is labeled D2)  If you consider the printed side of the paper as being the right side of it, your pieces are wrong sides together at this point.  If you would like you can anchor the piece there with a dab of glue stick.
    • Pick up 1 of the background rectangles and align it with an edge of the brown square, right sides together.
 
    •  Flip the whole thing over and sew on the right side of the paper, along the line between sections D1, and D2.
    • Flip over again and iron the pieces open.
    • Repeat the process with the D3.
      • I know it isn't very impressive at this point.  Hang in there.
    • Adjust the stitch length of your machine to something much larger and baste the long edges of your piece just inside the dotted line.  This will keep your pieces from flopping around. 
    • Trim section D along the dotted lines.
Paper piecing shines when the sections become more difficult. 
  •  Sections A - C - are marginally more complicated that D, due to the angles, but the process is the same.
    • Take a look at my notes....
 
    • The red lines are telling me how big to cut the background pieces for each section.
    • They are also showing me how to place them when I go to sew the pieces together.
    • The pieces are cut so that you can put the edge of the square piece 1/4" into the target patch along the sewing line.
    • See how the longer edge of the background patch is along the longer edge of the drawing?  You want it to look this way.  When the background patch is ironed open it will cover the space it needs to cover.
    • Hold the pieces in place, and flip over so that the paper is on top.  Sew on printed line.
    • Flip over so that fabric is on top.  Iron flap over target space.
      • Does it fit?  It needs to cover all of the area inside the box, plus enough around it's edges for the seam allowance.  If it does (which it should) you can trim the seam allowances if you need to.
 
    • It doesn't look like much from the front yet.
    • Repeat the process for the other end of the section.
    • Flip the paper side up and sew a basting stitch between the dotted line and the outer most solid square.
 
 
    • It still doesn't look like much on the fabric side.
 
 
    • Flip it over again and trim the excess.  You can "cut on the dotted line"!
 
Regardless of the pattern, the process is the same.  Take it step by step and you will be fine.  In this case slow and steady does win the race.  Your blocks will be beautiful!!


Sunday, September 1, 2013

Where did August go?!

Here I am again at the end of a month, wondering what the heck I accomplished.

I need to take this time to look back and remind myself that I do indeed do something with my time.

Tops to Treasures had another very busy month.  15 quilts were quilted!

 August 2013 - Tops to Treasures Quilting
 
S'more Mountains appeared on Moda Bakeshop
 

S'more Mountains
 
 
I spent a week in Kentucky...


Vacation Day #5
 
 
Went to a quilt show....
 

Chihuly's Gondola
 
Pack my son off to college...
 
So long for now
 
 
Received three of my Star of Africa blocks!!
 

August 2013 swaps
 
Thanks again to Fiona, Patti, and Benta.
 
Taught a class and got three more patterns approved for the Bakeshop....oh and I have been feverishly working on S'more Rows, a free row-a-long that starts here on September 16.
 
I'd say I did a little more than sit on my rump and eat chocolates.