Paper Piecing
I am by no means an expert on paper piecing. It is, however, on of my favorite methods of piecing small quilts.
 |
| Paper pieced mini made I made for a S.T.U.D. swap |
It works something like this.....you have a fiddly pattern with either tiny pieces or odd sized shapes. You can draw it accurately, but converting it to fabric is a little dicey.
 |
| A paper pieced fox?! |
What do you do? You draw the pattern on paper and then sew the fabric to the paper....use the lines as your seam lines. Sounds crazy I know, but it really does work.
Take a look at a pattern....

This block is made of three pieces. You could easily make it from a half square triangle and a square. However, what if the square was only 1" x 1"? The half square triangle would be too tiny to think about. The seam allowances would be bigger than the piece exposed. Not my idea of a fun time. Enter foundation paper piecing.
Use the paper as a foundation for your piecing and the tiny size doesn't matter.
Notice that the pattern has both solid and dashed lines. The dashed lines notate the outside edge of the block. This is the cutting line, used to square up your block when you are done piecing. The solid lines are sewing lines. They will be where your seams are when the blocks are put together.
The pattern also has numbers and letters. The letters indicate what section of the block you are working on. All pieces in the same section have the same letter. The numbers indicate a suggested order of construction.
The process entails aligning your fabric pieces with the lines on the paper, then using the paper lines to sew on. In order to see the paper lines you have to align the fabric with the back of the paper. You will need good lighting to be able to see what you are doing.
Because you sew on the paper lines, the paper becomes part of your block. You will eventually want to remove it...else have a crunchy quilt! To make this easier REDUCE THE LENGTH OF YOUR STITCHES. More stitches means more perforations means easier removal when the time comes.
Let's start with something easy....
 |
- Pick up 1 paper rectangle and hold it up to the light with the printing away from you. See the lines through the paper?!
- Center 1 brown square on top of the shadow of the square at the center of the paper. (It is labeled D2) If you consider the printed side of the paper as being the right side of it, your pieces are wrong sides together at this point. If you would like you can anchor the piece there with a dab of glue stick.
- Pick up 1 of the background rectangles and align it with an edge of the brown square, right sides together.

- Flip the whole thing over and sew on the right side of the paper, along the line between sections D1, and D2.
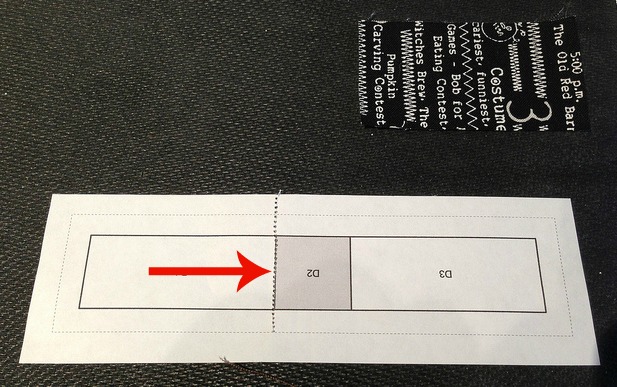
- Flip over again and iron the pieces open.
- Repeat the process with the D3.
- I know it isn't very impressive at this point. Hang in there.
- Adjust the stitch length of your machine to something much larger and baste the long edges of your piece just inside the dotted line. This will keep your pieces from flopping around.
- Trim section D along the dotted lines.
Paper piecing shines when the sections become more difficult.
- Sections A - C - are marginally more complicated that D, due to the angles, but the process is the same.
- Take a look at my notes....
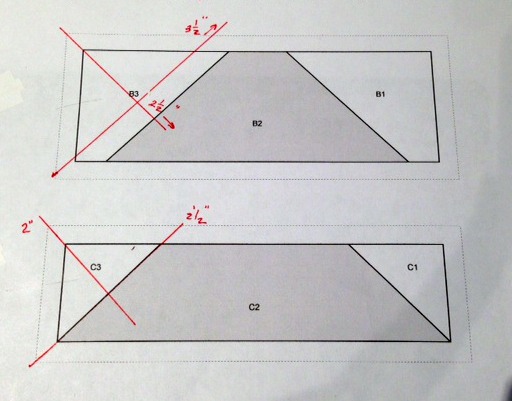
- The red lines are telling me how big to cut the background pieces for each section.
- They are also showing me how to place them when I go to sew the pieces together.
- The pieces are cut so that you can put the edge of the square piece 1/4" into the target patch along the sewing line.

- See how the longer edge of the background patch is along the longer edge of the drawing? You want it to look this way. When the background patch is ironed open it will cover the space it needs to cover.
- Hold the pieces in place, and flip over so that the paper is on top. Sew on printed line.
- Flip over so that fabric is on top. Iron flap over target space.
- Does it fit? It needs to cover all of the area inside the box, plus enough around it's edges for the seam allowance. If it does (which it should) you can trim the seam allowances if you need to.

- It doesn't look like much from the front yet.
- Repeat the process for the other end of the section.
- Flip the paper side up and sew a basting stitch between the dotted line and the outer most solid square.

- It still doesn't look like much on the fabric side.

- Flip it over again and trim the excess. You can "cut on the dotted line"!

Regardless of the pattern, the process is the same. Take it step by step and you will be fine. In this case slow and steady does win the race. Your blocks will be beautiful!!


